Sunday, July 15, 2012

The Shed Post

This past Friday evening with the help of my neighbor and his son the shed was completed (with the exception of a few shelves to put up inside.)

I roughed out the location of the new shed a few weeks ago, and after talking with a number of people with differing opinions on how to build a foundation I started getting things together.


At first I thought of having the front left post (the closest post in the picture above.) as the guidepost and having the wooden platform rest 5" above the ground.  After doing the line measurements that had a bunch of dirt having to come out of the rear right corner I changed the line measurements up to 9".  

Dave Sabat and I finalized the platform:

Yes, it looks like a huge palette.

After the foundation was verified level, I started the actual shed construction.  I was able to get the below completed by myself in a few hours:


Then Friday evening my neighbor and his son came over and we put the doors and roof on.  Its all waterproof since it rained that night and the shed was dry.


Now I can start moving things around and out of the utility room and the old shed.

Sorry for the rambling nature of the post.  Last night was quite the bachelor party for a friend of mine.

Wednesday, June 20, 2012

Rainwater Collection

The Cape St. Claire Garden Club [Link] sponsored a Rainbarrel Drive, and I got a nice large collection tub for $95.00. 

This works out rather well since the downspout in the back spills out right onto the patio stones.

As you can see, not optimal.
So, I got two cinderblocks, one from the backyard I had found and one my neighbor gave me.  I measured the spout and marked where I wanted to cut and used my electric Dremel to slice right through the metal.

I also shifted the support brace up to stabilize the downspout.  Then I crimped the 4 corners of the spout (to mount the curved flow out.)

So, that with the cinderblocks completed my 'site prep' for the raincatcher, and then I mounted it and ran some water from the roof gutter down and verified it worked.  The finished product will now do a number of things:
  1. Prevent erosion at the base of my foundation/patio.
  2. Prevent icing during the winter as I go out to get wood.
  3. Give me a place to dump water from my dehumidifiers.
  4. Provide water when I want to water deck/patio plants. 
The final product:

Depending on how the water weight stabilizes the barrel, I may think about putting a band around it to bind it to the house structure somehow, but I think its going to be fine.

Plan on posting a few more of the projects I've been doing, just been busy DOING and not typing.

Of course, lesson learned.  The woman who sold me the barrel mentioned olives...so I did a search online for olive barrels and found: http://www.epcontainers.net/id1.html.  Now price is $29.50/ea, and $32.00 shipping, and to cut the top, put a screen in and a faucet.  Yes, cheaper..and I'm sure I could find a local supplier from Baltimore.

Wednesday, May 23, 2012

Progress towards...

Past weekend and week have seen me keeping busy on many fronts with the house.  I got one of the 3 piles of brush cut-down, with branches in one pile, leafy brush in another and was able to mow the back some.  This included getting rid of some of the ivy growing along the ground on the edge of the property.  I need to define the backyard before it defines me!

I got some tiki torches for the patio and filled them up and test burned them.  They look good and will provide needed light in that area since I don't have any electric lights outside on the patio.  I did go up to the attic today and found what I believe is the junction box for some flood lights, there is a corroded floodlight connection on the corner I'll need to eventually get around to replacing/positioning.   I'd like to get one on the corner near the driveway and also mount an infra-red camera.

Monday the front entryway light burned out.  I went to replace it and upon prying the door hinge an inch the entire door tack-weld delaminated from the housing.  I replaced the lamp and decided to order a night lamp (I had been looking at replacements since February.)

Came up with:  http://www.affordablelamps.com/kic-49304azt.html which has a great look, and I may eventually shift the front post light to the same style.

Painting in the 'master' bedroom is coming along.  I've done 3 walls base layer, I want to get the last wall completed and then start to even out the rest of the walls.  I only bought 1 quart of paint to do the work and things are going well, just need to be miserly.  (This last wall is the wall with the door and the closet, so going to be using a lot less paint!!!)

Since Memorial Day is coming up I opened up my 'wish list' of furniture and went shopping to the Room Store.  For a bedroom set, I ordered http://www.roomstore.com/bedroom-furniture/bedroom/package-specials/carmel-ii-5-pc-queen-bedroom/1535326.aspx, Queen bed with a rather pricey mattress (posterpedic, etc.) the dresser withOUT the mirror (yes, looks nice, but for 150.00 I can walk into the bathroom.) and a nightstand.  For the living room I ordered: http://www.roomstore.com/living-room-furniture/upholstery/package-specials/jeffery-ii-5-pc-living-room/1440909.aspx, With a sofa, the large single chair and the 3 tables it should fit nicely into the living room area.   All for ~$3300.  A co-worker told me he also has had the Jeffery LR set and had fairly good reviews for it.

I'm still up in the air about going out and getting some sofa's/love seats for the media room.  I'm up in the air between some reclining seats at LA-Z-Boy that will be around $1100/w the fabric I'd probably want, or going to Value City Furniture and finding something I like for $599.  I'll be getting most likely 2 reclining sofa's, and yes, I can wait, but looking at the options and getting it DONE will make me feel that much more 'complete' as a homeowner.

Special thanks to Dave for helping me move some old bookcases and a dresser from my mom's house!

Monday, May 14, 2012

Field Work!

Been doing a lot of 'little things' that are leading up to a big thing.  I've been clearing a lot of the brush on the sides of the property line, and I've 'discovered' (I kinda figured it was there, but it was surprising to see the condition.) of a path that goes from the shed in the back up to the back porch area. 

Over last week and this past weekend I cleared the path and cut/hacked and shoveled vines/trees/bushes that had taken it over.  There is still work to be done and I hope to have 'before/after' pictures up shortly.

I've also made some decisions and removed a mulberry? tree from the far back yard that was entangled w/the grape vines, it doesn't belong where it was, and I want to clear that small area up and make it into a peaceful 'remote' place to sit and be surrounded by nature.  Funny how cutting a tree down will lead to that.

I went and bought some 4x4's and 2x4's and built a wood rack using a design that Dave Sabat uses in his backyard.  Felt good getting it setup so I can finally finish moving the wood from its 'pile' and into an organized area, especially in preps for wintertime.  I do NOT want to be crawling all over the backyard in potentially icy/snowy conditions trying to load wood every few hours.

Have a few more things I've purchased, another set of drapery rods for the dining room that will match the other set I have, some blackout film to put on the windows in the media room to cut down on the light coming in (along with the shear red/velour drapes I hung a few weeks ago) should make a big difference (and look FANTASTIC.)


Wednesday, May 2, 2012

A few things.   I am away for the week, but in the mean time I'm finally getting sometime to put up some pre/post pictures of the roof/gutter work I had done two weeks ago.  Also, show some pictures of the old shed.  This shed is the NEXT PROJECT I will be focusing on.


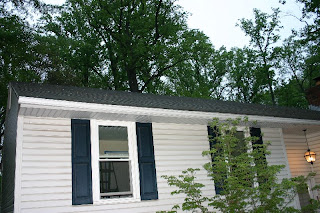
As you can see, the old roof did not have any drastic indication (from the front) that it needed replacing.  You can see that the gutter ran the whole length of the house with only 1 spout on the front and one at the back.  (This was changed to having 4 spouts for each corner.  [You can see the ladder and tape in the window for the painting I'm also doing, that's for another post!]

The back of the roof has more indication that something needed to be done:


As you can see, the gutter was starting to come away from the fascia and the shingles were growing moss.  As I think I mentioned in my last post I had gotten some estimates and decided on a roofing company out of Odenton, MD.  They came over on a Friday, and in a day changed the above to:

The shingles are 'brighter' and match the shutter blue/gray look very well.  They also cut into the chimney for new flashing that makes it look QUITE smart.

As you can see, the gutters are looking good, they also did some great work around the vent pipes (not shown.) 

The only thing of note was that in front of the bay window there was a bit of fascia & soffit that were rotting.  They repaired both for ~$200.  The company worked quickly, brought their own dumpster (which they left for the night and let me put some of my other larger trash items in...no charge!)

So, pleased so far, and it has rained a few times since then and haven't had any issues.

Next up, the shed.

 As I start to reach out into the backyard and do work, it has become apparent that I will be needing a functional storage space for my yard care equipment now rather than later.  This will also be a great time to learn some of the finer points of construction/tool usage.

A Gambel Roof-style 8x8 Shed.<- this website has a few free plans for sheds.  Some are no longer functional, but I think I'll be able to use these specific plans to show the housing community/commission my plans on the replacement.  The county requires permits for anything over 64 sq. ft.  I have to verify what the current shed size is, it looks 10x10, and if it is, I may just rebuild it, I'm still 'digging' into the shed to get the equipment/bags of things out. 

Anyway, the shed truly needs replacing as can be seen below.  I'll be posting more on this as I get into it.


Thursday, April 19, 2012

A new roof incoming!

After reviewing 3 different quotes for roofing and gutter replacement I went with Fichtner Services out of Odenton, MD.  With two co-workers recommendation, plus an Angie's List high score/good reviews it overcame the ~$200 more they wanted to charge for the gutters.  The roof replace was pretty much the same on all three quotes.

Fichtner does both GAF and Certainteed shingles, I read a bunch of reviews of both and they appear to push GAF more, (one of the other companies recommended Certainteed above GAF.)  As long as the warranty is good, and the shingles work...I'll be happy.  From what I read online they both make good products, its more the people who put it on and how well that is done.

Colors, I was shown the below as my options:


I went with Pewter Grey, the swatch under the 'red' shingle.   It is very similar to the 2nd from the top in the first column, but less blue.   I'm getting a full pull-off, with new underlayment plus "Weather Watch" leak barrier for the first 3'.  There was a coupon on Angie's List for $250 off, but the sales person said it was supposed to be for only roofs over a certain size.  I called him on it and he said he'd upgrade my downspouts (yeah I'm sure I just said that...) from 2x3" to 3x4" and all in all I was fine with that.

The work is scheduled for tomorrow (Friday 4/20) so I will take a few pictures before/during/after.  Weather is supposed to be great for the work.  Even though it is a lot of money, I am looking forward to getting the roof off the 'list of concerns'.  (and here's to it staying off it for many years!)

On other projects, I've taped up the main bedroom, bought paint so I should be having the bedroom done soon.  I also got a new wheelbarrow wheel plus some seeds/seed starter kits to get a few flowers/plants germinating.

Really want to think about taking that wall down in the bedroom.  It will be a 'major task' but I think getting it done sooner than later.

Wednesday, April 11, 2012

Deck lighting

Got home from my trip to Boston yesterday, and after getting home from work today and getting some sleep, I went out shopping for a new round of things that need to get looked at!

Last week I had removed the old, non-working back light off my kitchen.
As you can see, rusted, pitted and also...not very attractive.  One of the things that having a house does make you develop is a personal sense of style.  I've always been attracted to Frank Lloyd Wright's work, and its associated Prairie-style.   I found Hampton Bay Mission Hills Wall-Mount 1-Light Outdoor Oil Rubbed Chestnut Lantern which, while expensive, fits the decor I want.  

The previous fitting wasn't connected to a junction box, so I used some un-used washers & metal screws to dig into the white plastic mount.  I was more concerned with how the power leads were going to be connected then with measurements at this time.

But it screwed in tightly, which fit the bill.  The mounting screws (the long silver screws to the left and right in the picture above) are too long for the mounting counter-screw (pretty faux-bronzed screw cap that will attach the light to the bracket.) so I had to dust out the Dremel tool and cut off about 1/2" from both screws.

Afterwards, this was the result:

As you can see, the lantern look is GREAT!  The mounting panel is NOT even though, so tomorrow I will remove the lamp and shift the bracket up about 1" to center the light on the white panel.

I also got another estimate on the roof.  I'll make my decision tomorrow.  I decided to sign up for Angie's List for this month since I'm going to be looking at both roofing & heat pump installations, the discounts it gives plus the reviews are worth it in the short-term.

Tomorrow, look for some work in coaxial cabling in the basement.